Ponti-yakin.
Ponti-yakin is talking about Pontiacs --
discussing, cussing, learning, teaching, and having fun with them.
Since I've had my 56 Safari, September 2001, I've
been learning about theses cars, mostly from Bob Johnson, a 56 "expert" who's
had six 1956 Pontiacs since 1968, including a couple of Safaris and currently a
convertible with restoration in progress (see
About Bob). He used the subject "Ponti-yakin"
in some of our emails; I like that terminology. Here is some 1955, 1956,
1957 random Ponti-yakin I think is worth keeping, perhaps some of it will
evolve into full articles (like the initial wire wheels Ponti-yaking turned into the
Wire Wheel Covers
article). Perhaps I'll organize it somehow someday but for now, I'm just
publishing as random questions/answers for your entertainment and education.
I'll probably add to to the top of the list as good informative Ponti-yakin
happens.. Larry Gorden
1956 Full Disk Hubcaps (Star Chief and 870)
Question. Most 1956 Star Chiefs
and 870s came standard with full disk hubcaps. What are the two
different types?
Answer from Bob.
Basically, the type I call "Tiger Teeth" or "saw tooth" uses a series of
serrated flanges (sort of like a saw toothed edge) rimming the reverse side
of the full cover cap. These are a press fit into the steel rim to grip the
wheel, and consequently are often dented from rough handling during tire
changes. The "Dimple/Pimple" or "Wheel Bump" type have a continuous stainless
steel rolled rim on the reverse side of the cover with several depressions in
this rim that snap over a series of small bumps (maybe "pimple" would be a
better description) on the original style steel wheels for '56 Pontiac. I
believe there are about half a dozen of these bumps on the steel wheel. These
"wheel bump" type are easier to get on and off, so are usually don't show as
much rough handling damage.
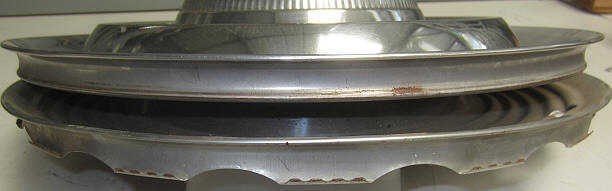
The two types (upper is '56, lower tooth type is '55)
The first type tend to
make a clicking noise (most often on the front wheels) when the car is
rolling at low speeds (suspect this is due to flexing of the steel rim given
the engine weight up front), but the second type don't stay on the cars very
well, particularly in hard turns or going over speed bumps, so it's debatable
as to which type is better.
The "dimple/pimple" type
have the added disadvantage of requiring the correct Pontiac rims with the
corresponding "pimples" on them, or the covers simply will not mount to the
rim.
1955, 1956 Rear Bumpers..
Question. Are all the rear
bumpers the same, excluding the 860/870 station wagons?
Answer from Bob.
There is a difference between '55 and '56 Starchief/Chieftain rear bumper
blades. Since in '55, they did not offer dual exhaust, bumper blades with the
two holes in the bottom to accept exhaust tips are a '56 only item.
The real beauty about
these bumpers though, is that with a good template, a few drills, a welder,
and access to a plating shop, you can modify any '55 or '56 rear bumper blade
fit any other design by drilling & filling holes as necessary.
As best I can recall, yes all '56's did have the two holes whether equipped with
the exhaust tips or not. All the Chieftains I've ever owned or saw had these
holes despite most of them not even having dual exhaust, let along exhaust
tips.
From what I've learned
over the years, the 'assembly plant' mentality is to make all parts as totally
interchangeable as possible. They certainly didn't want to either stop the
line (worst case) or have to add more space on the line (second worst case)
for different bumper wings just for the occasional car coming down the line
with exhaust tips specified on its build sheet. Labor and time "on the line"
were the major cost factors (and probably remain so today) in running the
assembly plant. Materials, when dealing in the volume that car manufacturers
do, were the cheap part!
This idea of total
interchangeability even applied to replacement parts as the cars aged. If you
research this in the master parts catalog, you'll often find four to six years
after a car may have first been built, that various replacement part numbers
in the most current master parts book often change from the original. I
believe this is the result of re-engineering (or 'reverse engineering') of
parts to fit multiple years. The later numbered parts often have slight
differences in appearance to the original assembly line pieces, but generally
are the functional equivalent of the original. This goes on even today in the
industry.
1955, 1956 V8 Emblem.
Question. What
types of V8 emblems were found on 1955 and 1956 Pontiacs?
Answer from Bob.
There were several versions of the "gold" V-8 emblem used on 1955 - 56
Pontiacs. Currently Ames Performance has available reproduction emblems that
are generally recognized as "correct" for 1955 Pontiacs and similar to 1956
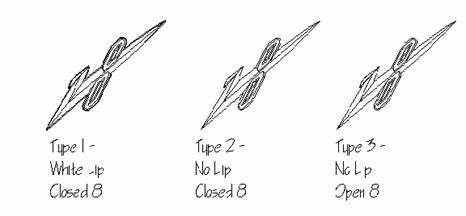
Pontiacs. The drawing below shows the three types with which I am
familiar.
Type 1 - is a
heavy-weight base metal (presumably pot metal) emblem plated with a shiny
polished gold plating (probably brass, since the color is very "brassy") that
also has a narrow lip around the perimeter of the emblem. This lip is painted
white. I believe the "holes" in the 8 are "closed" with a pebble finish
background, but since I don't have any of these emblems in the parts bins
(considering them to be '55 only) I'm unable to confirm this. Some folks
claim these emblems were used on early production 1956 units as well as 1955.
Type 2 - is a
light-weight aluminum base metal emblem anodized with a matte-finish bright
gold (yellowish like 14 K gold) anodized plating and the "holes" in the 8 are
"closed" with a pebble finish background.
This is the emblem type I
believe is generally correct for most 1956 Pontiacs. More often than not, used
emblems of this type have the gold anodizing rubbed off, since the finish is
very thin. The finish matches the finish used on the "Pontiac" crest used on
the speaker grille. This type V-8 emblem is the one I have personally found
as original equipment on every 1956 Pontiac I've either owned or found in the
wrecking yard and at most meets in Southern California. However, at the meet
in Niagara Falls back in 1983, I found the polished gold "Type 3" emblems on
some '56's at that show. Hence the dilemma.
Type 3 - is an
emblem type I've found in a heavy base metal plated with a shiny polished
gold plating (again, the color appears brassy), but this emblem has "open"
holes in the 8 so that the painted finish of the car is visible through the
holes.
I've been told these were
used in early production 1956 vehicles, but that's only hearsay. I've never
been able to document which years may have come with open 8's and/or whether
they were early or late production changes, or for that matter, a difference
dependent upon the plant in which the car was assembled. If the Type 1
emblems used on
1955 are also "open" 8
types, it's possible this was a transitional emblem used in early production
1956's before the Type 2 emblems were available, and reused the old '55 molds
simply omitting the painted lip.
That might explain why
some believe Type 1 emblems were used on 1956.
If the finish were the
same polished brass finish some folks would never notice the omission of the
lip. Of course, this is all conjecture on my part at this point.
1956 Horn Button.
Question. What
do you know about the 1956 Horn Button on the Deluxe steering wheel?
Answer from Bob:
There were two types of horn buttons. One type uses a stamped steel outer
shell that is crimped over the backing plate to hold it all together. This
type is nearly impossible to get open and I've not found a way to neatly close
it back once you do open it. The other type, though, used a pot metal outer
shell that has three peened pins to hold it closed. The pot metal unit has
very crisp square edged ridges, and is a much nicer looking button. These
units can be opened and closed again if done carefully and gently, so you can
replace a cracked lense, or for that matter switch from a standard to power
steering lense and backdrop. Standard steering units typically have a silver
tapered cone and silver back drop behind the Indian Head. Power steering
units typically have a gold tapered cone and gold back drop behind the Indian
Head. So there's more difference to these buttons than just the lettering on
the lenses.
1955, 1956 Radios.
Question. My 1956 radio doesn't
work, what should I look for?
Answer from Bob.
These old radios are built in two parts, the receiver, which has the knobs,
tuner and push buttons, and the amplifier where most of the tubes, the
vibrator, and the speaker are mounted. The two simply plug together and the
amplifier is the same for all three radio types used (standard, deluxe and
wonderbar). If I recall correctly, there is a three prong plug with
steel-braid shielded wires that connects the two together, and the amplifier
is held up in the dash by two large pan-head phillips screws that screw up
through the bottom edge of the dashboard.
There should also be a
brace between the amplifier and the receiver that will need to be
disconnected. Then the whole amplifier unit comes right out from under the
dash complete with the speaker.
The power lead runs
between the radio receiver and the fuse block, and the antenna lead plugs into
the receiver as well, so unless the wires interfere with removal of the
amplifier, you needn't disconnect them.
As for the radio, you
might also try hooking up an external antenna (a little $5 replacement antenna
from Pep Boys or Kragen makes for a good bench tool, although in a pinch, even
a coat hanger hooked to the old antenna stub can sometimes work)....the point
is to ensure you have a good antenna feed into the radio. With the antenna
attached and fully extended, put the volume up moderately high (or as loud as
you and your neighbors can stand it), and then twist the tuner knob to see
what you get. Usually the push buttons are set to a "local" station, but who
knows where "local" was when the car was last used.
Even a crackly signal
with somewhat inaudible or garbled words will mean the radio's
working....though the next diagnosis problem may be to determine whether you
need a replacement speaker (chances are good you will). The cones in these
tend to dry out and tear....making them crackle and rattle instead of giving
good clean sound. but a pair of jumper wires from each of the two speaker
leads to a good speaker will quickly determine if a replacement speaker is
needed and whether the speaker circuit is functioning properly.
All years, Oil Pressure Line Restoration.
Question. How did you restore your oil pressure line?
Answer from Bob. I've also now finally got a good oil pressure line
in place from the filter to the dash gauge. I believe I told you, I had a
really nice line all cleaned up, refinished and 3/4 installed, when I flexed
it a bit too much and the line kinked and broke. That cost me about 8 hours
worth of work right down the drain.
I've learned another
couple of lessons in the process. First, when reinstalling this line it's
probably wise if you don't fasten it down to the firewall or install the
firewall rubber grommet until you have both ends of the line screwed into
place. This leaves more flexibility in the line so you can get it properly
positioned to screw in the ends without it kinking. I had everything fastened
down tight while trying to fit the filter end of the line into its fitting,
which is likely why it kinked.
Second, as you know,
these steel oil lines have an asphalt treated cloth covering on the line from
about an inch from the gauge to just about an inch or two below the point the
line makes a 90 degree vertical turn at the ignition resistor and heads down
to the oil filter. This cover provides a heat insulator to protect any wire or
plastic that may otherwise come in contact with this "hot" oil line under the
dash, as well as to protect the mechanic's hands from burns when working on
the ignition system. Generally speaking, the portion of this cloth cover
that's exposed under the hood is rotted, dry and crumbly, if not already gone,
due to the abuse and weathering to which it's been subjected over the years.
To "restore" this line
and its covering, I first gently washed the line in simple green, and then use
a wire brush wheel to as gently as possible remove all old dirt, rust and
grime from the line itself. This was followed by a good metal polish to
brighten the line. It has a very light clear zinc original finish that will
probably either already be worn off, or may polish off in the clean-up
process. Thus, for rust resistance it's probably advisable to coat the line
with a good grade of heat resistant clear finish after it's repolished.
To "restore" the asphalt
impregnated cloth cover, I've neatly cut off the rotten part of the cover
squaring up the end, then gingerly slid the cover along the oil line,
carefully working around the bends and turns, so the sound portion of the
cover that was previously under the dash will now be exposed under the hood.
This of course leaves the portion of the line under the dash bare. To "fix"
this problem, I used a larger diameter piece of similar cover material (large
enough to fit over the line fitting) and slipped it over the interior end of
the line, covering all but about the last inch of the line at the gauge end
and lapping the larger cover over the end of the original cover under the
dash. This may be best done before you put the line into the dash. Thinking
it would be easier to install the bare line through the firewall, I did it
afterward and had a bit of a struggle working the cover around the bends in
the line, particularly in the confined space under the dash.
This larger diameter
cover material is commonly used for headlight wire harness work, and so I've
found it available through some of the wire harness vendors at Pomona. I'm
not sure just how hot the line gets, but suspect it's probably hot enough to
melt plastic insulation.
Anyway, then I soaked the
portion of the original cover that will be exposed under the hood in
Eastwood's "Underhood" semi-gloss black paint (i.e. I sprayed it heavily and
let it soak in). The end product looks absolutely original. The paint seems
to toughen up the cover and I believe will make it easier to keep clean since
the original asphaltic coating tends to attract and hold dust and dirt. I
suspect no one will know the difference unless and until they crawl around
under my dash!
1956 Remote Control Mirror.
Question. I saw a remote control mirror on ebay, what to you
think about them?
Answer from Bob.
I believe a rough remote control mirror may be more trouble than it's worth.
These things are extremely rare and so replacement parts are really tough to
come by. If you find an NOS or mint unit complete with installation
details/instruction, it would be a great option to have, but I'd hate to have
to try and restore one that's pitted/dented and needing refinishing, or worse
still, broken or inoperative, and then there's the challenge of trying to
figure out how it installs properly. If you didn't take it off of the car it
was on, and get patterns for the mounting holes etc., it can be a real
challenge! Many of these things are counter-intuitive. It's always best to
talk to the man who has one....so if you buy, you'll need to find a club
member who has one installed on his car to get good advice!
Charles Sihilling, the
plater I use, tells me the only way to refinish these old mirrors is to break
out the glass, remove the stainless "reflector dish" piece, replate the base,
then reinstall the stainless piece (after polishing it), and then replace the
mirror glass. Because the mirror glass is a press/formed-fit in the stainless
dish, I've never found anyone who claims to be able to do this, and I've never
attempted it on my own. I'm not sure it can be done without damaging the
stainless.
All years, Used Plastic Parts.
Question. Where is the best place to get used plastic parts such
as dash knobs?
Answer from Bob. When looking for replacement plastic and interior
parts, units from the Pacific Northwest and back east will generally be in the
best condition; look for rust free metal and exterior trim in the southwest,
but expect any fabric/plastic and painted finishes to be shot from all the
heat and low humidity!
Safari B-Pillar Paint Scheme.
Question. What
do you know about the post color on the Safaris? All the sales stuff show the
post painted the same color as the bottom. I've seen pics of a couple painted
like that but most have the post painted the same color as the top. Perhaps
they were painted different in different plants or perhaps they changed it mid
year.
Answer
from Bob. You
are correct that the official literature issued by Pontiac shows the color
split at the top of the B pillar with the pillar painted in the lower body
color. But, I (and most other Safari enthusiasts) don't believe any cars were
every actually painted that way from the factory. Despite the literature,
I've never seen any period pictures or dealer photo's that show the color
split at the top (thank goodness...to me, it looks awful that way).
If you look again at the
web site you directed me to, you'll note that the two tan and white cars that
had pictures available are both painted with the 'B' pillar in the upper body
color, but they also both are painted with the most common "error" in terms of
the color split line. Both of the Safaris pictured at the web site have the
paint split "dipping down" into the body line, which is technically
incorrect.
The "factory" color split
is a straight line originating at the point on the rear edge of the door
opening in the crease between the pillar and the body bulge. From there, it
extends in a straight line until meeting the lower reveal molding on the
sliding side glass window. The upper body color, as painted from the factory,
did not extend down into the "dip" in the body bulge, although admittedly, to
do so does accent one of the most pleasing lines on the car.
My Safari was painted
with the straight line (not dipped) separation which matched the original
factory paint layout on the car before the re-paint. So to me, whether any
cars were ever factory painted in a different manner didn't really matter. I
knew this car at least was repainted to match the original factory finish.
The straight color split
line was apparently used to match the look of the Nomads, even though the
Nomad bodies do not have the same "voluptuous" body curve like the Safari.
Many people have never noticed that subtle difference between the two makes.
The absence of the "dip" on Nomad's has always seemed strange to me, since the
Chevy hardtops/convertibles, like the Pontiac, do have this same body contour
line. I guess the Nomad stylists at Chevrolet just didn't recognize a good
thing when they saw it. But then, some would say that neither did Pontiac
since they didn't accent this body line by "dipping" the color separation
line.
Oh well! ....and so the
controversy continues...to dip or not to dip! At the end of the day, if
you're a "purist" you don't dip....if you're more relaxed about absolute
authenticity, perhaps you do!...it's really a personal choice, The
non-enthusiast will never know the difference, and few Safari "experts" will
ever fault you either way.
Safari Carpet.
Question:
I have original carpet in
the loading area of my 56 Safari+ but not on floors. The loading area carpet
is a short loop carpet and I guess that must be "Daytona Weave". Is that
correct?
Answer from Bob.
Yes, the floor carpet and
cargo area carpet are the same weave....but the backing on the originals is
slightly different. The cargo area used a thinner backing (go figure) than
the floor carpeting. Also, in the Safari's there is an area of the floor
where a colored rubber mat was used rather than carpet. Specifically, under
the folding rear seat. This area is generally only seen when one is operating
the folding the seat, but if your looking for absolute originality, it's one
more detail to fuss over. I've yet to see one still intact in any Safari out
here on the west coast....but back east a lot of rubber, cardboard and plastic
items held up a lot better due to the more humid weather. Out here things
seem to dry up to crispy critters rather quickly. Of course we have a lot
less rust and our exterior bright work holds up better....guess you can't have
everything.
Question: What carpet was used in 1957?
Answer from Todd Crews. POCI 1957 Technical Advisor.
Daytona Weave
was used in 1955-56, but changed in 1957 to the regular 80/20 loop.
Safari Exhaust pipe deflector
Question. Did
the Safaris have a tail pipe deflector?
Answer from Bob.
Safari's used a unique exhaust deflector accessory different than the exhaust
tips for other Star Chief models. The exhaust deflector used is the same as
was available for 1955 (which were all single exhaust cars), and is a chrome
plated "tin" exhaust tip that clamps onto the end of the tail pipe. It's a
very unusual design and a highly sought after option.
1955, 1956 Safari "Knuckle Buster".
Question. What is a "Knuckle Buster"?
Answer from Bob. "Knuckle buster" is the nickname given an early
production center rib that was used on some '55 Safari's and Nomads.
Essentially, the difference between the knuckle buster and the late production
center ribs was the "section view" of the rib through that portion of the rib
that was between the two mounting holes for the tailgate handle.
On the "knuckle buster"
this section carried through the handle with the same ribbed section. On the
late production ribs, the section under the handled was modified (flattened)
to allow more room for your hand to lower and raise the gate without banging
your knuckles on the rib contour.
My
Safari #2 had an "NOS" Knucklebuster center rib on the tailgate. Urban legend
has it, some parts dealer/supplier found a stash of NOS knucklebusters left
over from the change-out in production.
Others simply claim the knucklebuster was the first center rib to be
reproduced because it was so rare....but these are just "legends"...I've never
been able to substantiate either story. Not too many folks even want the
knucklebuster these days, but it's an interesting bit of trivia.
Ponti-Yakin
Question: Do you have any good Ponti-yakin?