How to Restore 1956 Pontiac Dash Face
By Bob Johnson, edited by Larry Gorden
April 1960
The 1956 dash face is made of aluminum with horizontal ridges. This article tells how to restore that aluminum dash face. You might be able to adapt this process to restoring the aluminum on a 1955 Pontiac dash.
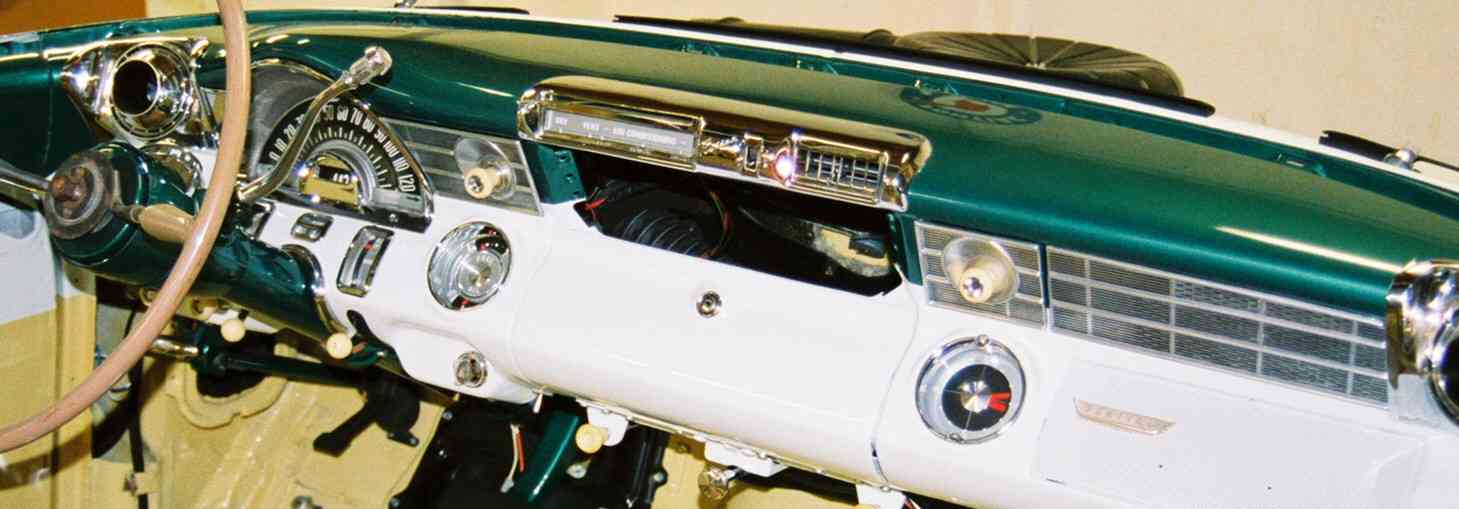
There are four aluminum pieces that make up the 1956 Pontiac dash face. This is the driver’s side. There is one aluminum dash piece to the left of the speedometer and one to the right.
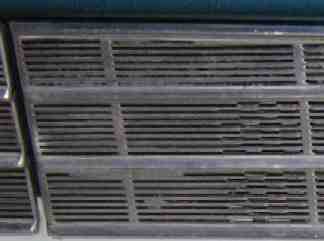
Below is the passenger’s side. The aluminum dash piece has slotted holes in it that allow it to serve as the radio speaker grille. The ash tray face is of the same pattern and material.
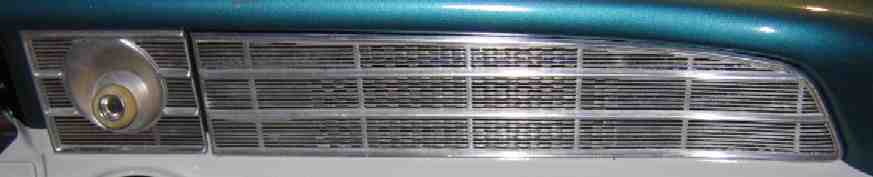
The recesses between the ridges is (or should be) painted black. The black paint is often flaked off and the clear coat yellowed.
This is the process I used to successfully restore my dash aluminum.
Remove the aluminum pieces from the dash and the ash tray face. The dash face aluminum pieces are secured to the dash with nuts on the on the back side up under the dash. You’ll need to remove some of the instrumentation in the dash and the radio speaker unit to get to the nuts. Be very careful with the aluminum pieces, the metal is soft and is easily damaged.
Wash dash pieces with Simple Green to get all the scum, dirt, oil and odd bits of soil/corrosion off the pieces.
Use a small piece of 600 grit sandpaper to wet sand all the large horizontal ribs (the four edges and two center ribs) on each piece to remove the factory finish from the aluminum. It appears the factory finished them with a thin anodized coating.
Polish the raised ribs to a high shine using a dremel tool and a good grade of metal polish. I used a 3/8" diameter buffing wheel and 1/2" long cotton buffing tip (bullet shaped formed cotton) with Meguiar's Mirror Glaze #28 All Metal Polish, one jar will do a lot of polishing. Use the lowest speed setting on the Dremel (1000 RPM) and lots of patience, as well as hand polishing with lots of patience. The Dremel tool dries out the polishing compound very quickly, so need to apply frequently. buffing tip needs to be very well centered to avoid high speed bouncing of the tip, which leaves a rippled polished surface....hand buffing can eventually eliminate the ripples, but best if you can avoid them altogether.
Hand polish the painted sections between the strips to remove any loose paint and to clean and prepare the surface of the old paint.
Use Scotch Magic Tape to mask the polished large ribs so the edge of the magic tape is just clear of the recessed areas that bear the black paint. Mask as much as you can here, as it's less paint to remove in the next steps.
Once all the ribs are masked, spray paint the entire area between the larger ribs with two generous coats of black lacquer (gloss, semi-gloss, or flat doesn't really matter), the intent being to fill-up the recessed areas with fresh black paint. After allowing 90 minutes drying time (you may need to allow more time depending on type of paint you decide to use), remove the magic tape.
Allow two days cure time to let the lacquer thoroughly cure.
Cut a "Magic Rub" white eraser (about 3/8" thick by 1" wide; a pink pearl eraser might work as well, but is tougher to cut than the magic rub) into a small 1" square piece. Use some of the trimmings, to fashion a small triangular piece of eraser about 1/4" thick by 1/2" high tapering to a point in about 1/2" (2:1 taper). The rubber eraser and triangle will serve as "sanding blocks" for the next step.
Wrap the "sanding block" with 600 grit wet/dry paper and wet sand the area between the larger ribs working as carefully and gently as possible. Use the triangular block to get into tight corners and narrower areas. It takes the better part of a day to sand all three pieces.
Touch up the black with a very small paint brush where paint either flaked off, or was sanded too much.
Generally, the painted stripes should be crisp, straight and true. But extreme caution is needed to avoid sanding too much. If you get too energetic, the exposed aluminum strip will get ever so slightly wider than it should because the edges of these recessed areas a ever so slightly beveled. So you only want to sand until you just drop through the paint on the ridges, and avoid removing any of the aluminum ridges if possible. Working very slowly and gently this can be done.
Hand polish all the areas between the ribs again, until the exposed aluminum is at least semi-shiny and the ribs are highly polished once again (some sanding marks invariably get on the ribs).
Last step, clear coat (two coats a half hour apart) with a semi gloss clear lacquer. This should result in a soft satin finish where the aluminum was highly polished, and slightly more matte finish where not as shiny. I double coated for durability, and in the hopes of getting just a hint of color from the clear (the original NOS piece I have appears to be slightly more yellow where it's been coated between the ribs over the black paint). But the clear I used hasn't yellowed any at the smaller ridges, but it's a good match to the original soft anodized grey finish on ribs and smooth areas of these pieces.
The black painted lines are now generally crisp and fully black again (and no longer extend beyond the edges of the recessed areas like the original silk screen paint process did).
All in all, a good solid two days effort is required for restoring all the aluminum dash pieces.
With patience, a highly presentable restoration is possible. With practice one could even get to be an expert at this, but you definitely need clean undented or damaged pieces to start with. I had the most difficulty trying to fix deep scratches and dents. The aluminum is so soft you do more damage trying to straighten than if you just leave things alone.
Material used:
600 grit wet/dry sandpaper, one sheet
250 grit aluminum oxide sandpaper (for quick cutting of heavy corrosion/imperfections), one half sheet .... go easy on this grit it cuts the aluminum really fast, and leave deep scratches that take some time to work out if you get heavy handed.
Dremel tool with the 3/8" diameter buffing wheel and 1/2" long cotton buffing tip (bullet shaped formed cotton)
Meguiar's Mirror Glaze #28 All Metal Polish, one jar will do a lot of polishing, used the lowest speed setting on the Dremel (1000 RPM) and lots of patience, as well as hand polishing with lots of patience. The Dremel tool dries out the polishing compound very quickly, so need to apply frequently. buffing tip needs to be very well centered to avoid high speed bouncing of the tip, which leaves a rippled polished surface....hand buffing can eventually eliminate the ripples, but best if you can avoid them altogether.
Frazee Fast Drying Spray Paint (Lacquer), #16101 Gloss Black, one can is sufficient to do dash trim for several cars!
Deft (Irvine, California), Semi-Gloss Clear Wood Finish Lacquer (UPC 371250113), again, one can is sufficient to do dash trim for several cars.
Bob's Dash.
Here is Bob's dash after the aluminum restoration. FIRST CLASS!!! You don't often see AC in a '56 convertible.